Modified Bitumen Roofing

What is Modified Bitumen Roofing?

It is a flexible, waterproof, and durable roofing material made from asphalt, polymerized rubber or plastic, and fiberglass or polyester:

  • Modified Bitumen is a hybrid material combines asphalt membranes with polymerized rubber or plastic and is reinforced with fiberglass, creating a sturdy yet flexible roofing material.

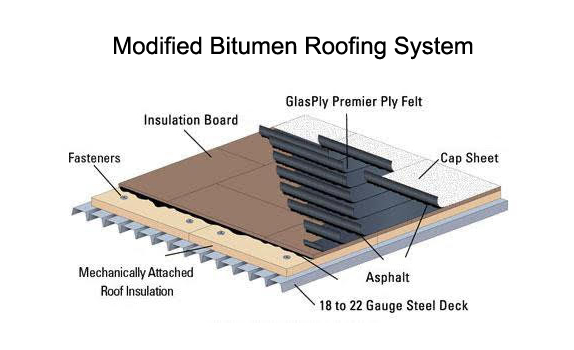
MB roofing or Torch down can be installed in various configurations, including two-layer and multi-ply systems. The type of facility, location, access, deck, insulation type, climate, and customer requirements are some of the reasons for the various installation methods.

Mod bit is common in commercial, industrial, and residential applications and ideal for use on flat and low-slope roofs. Depending on the material type, these systems generally consist of two or more layers (multi-ply).

What we do

Step 1: Preparation
Inspection and Assessment: Thoroughly examine the existing roof for any damage, leaks, or structural issues that need to be addressed before proceeding.

Removal of Old Roof (if applicable): If the existing roof is beyond repair or incompatible with modified bitumen, it needs to be carefully removed.

Cleaning and Repair: Sweep the roof deck clean of any debris, dirt, or loose material. Repair any damaged areas, cracks, or punctures in the deck.


Step 2: Installation of Base Sheet

Application of Primer: Apply a compatible primer to the roof deck to ensure proper adhesion of the base sheet.
 
Laying the Base Sheet: Roll out the base sheet, ensuring proper overlap and alignment with the edges of the roof. Secure it to the deck using appropriate fasteners or adhesives


Step 3: Torch-Applied Modified Bitumen Layers
Torching the First Layer: Heat the underside of the modified bitumen roll using a torch while simultaneously unrolling it onto the base sheet. Ensure proper overlap and adhesion between the layers.
 
Torching Additional Layers: Apply additional layers of modified bitumen in the same manner, following the manufacturer’s recommendations for the number of layers and overlap.


Step 4: Self-Adhered Modified Bitumen Layers (optional)
Peeling and Sticking: Remove the release liner from the self-adhered modified bitumen sheet and carefully adhere it to the previous layer, ensuring proper overlap and adhesion.
 
Rolling and Sealing: Use a heavy roller to ensure proper bonding and eliminate any air bubbles or wrinkles.


Step 5: Flashing and Detail Work
Install Flashing: Install flashing around roof penetrations, such as vents, pipes, and skylights, to prevent leaks. Use appropriate sealants and adhesives to ensure a watertight seal.

 
Address Details: Seal all seams, edges, and corners with compatible sealants or adhesives to prevent water infiltration.


Step 6: Finishing Touches
Apply Protective Coating (optional): Consider applying a reflective or protective coating to the finished roof to enhance its durability, energy efficiency, and longevity.
 
 
Final Inspection: Conduct a thorough inspection of the completed roof to ensure proper installation, adhesion, and sealing.
 

Benefits of Modified Bitumen

 
Durability and Longevity: Withstands extreme weather, UV rays, and foot traffic. Typically lasts 15-20 years.
 
Waterproof: Seamless, heat-welded installation creates a strong barrier against water infiltration.
 
Flexibility: Can expand and contract with temperature changes, preventing cracks and leaks.
 
Energy Efficiency: (optional) Reflective coatings can help reduce cooling costs.
 
Ease of Installation and Repair: Relatively quick installation process. Repairs are straightforward and localized.
 
Versatility: Suitable for a variety of low-slope or flat roofs.
 
 
Scroll to Top